Poinsettia
How Do You Get a Poinsettia to Turn Red Again?
The short answer
Grow a healthy plant, confirm its expected bract colour, then follow one complete autumn light-and-darkness routine. A practical Illinois Extension example uses uninterrupted darkness from 17:00 to 08:00, with bright daylight outside that period, starting in late September for its northern-hemisphere cycle. This is one protocol, not a universal biological threshold or a guarantee of Christmas colour.
Keeping a poinsettia alive and getting a new coloured display are separate goals. The green plant needs healthy growth first. The red parts are bracts, not petals, and a naturally pink or cream cultivar should not be expected to produce the red display of a different variety.
Diagnostic snapshot
What to check before you act
What you are seeing
- Stems and leaves are firm and the plant is growing well.
- Its label or previous display shows another natural colour.
Check first
Check the label or an earlier photograph for the cultivar’s natural colour. Examine the green foliage and stem base; a plant losing healthy tissue is not ready for an ambitious display schedule.
Compare first
- Healthy green plant with a known red cultivar
- Pink, white, cream or patterned cultivar
- Night treatment is interrupted
Hold off for now
Do not leave the plant in darkness all day, remove healthy green leaves or add bloom booster to force red colour.
Investigate further if
Pause the display programme if the plant starts wilting, rapidly losing leaves or developing soft tissue; investigate the active problem first. If it remains healthy but does not colour after the complete routine, seek growing advice using the start date, light arrangement and cultivar information. There is no reason to add a fungicide for absent colour alone.
Photograph this before you act
- Photograph the whole plant and its growing area so the overall pattern is visible.
- Take one close-up of the clearest symptom and one wider view that shows the surrounding area for comparison.
Next best check
Check two visible clues before you act.
This mini-check narrows the match using the same canonical diagnostic clues as this answer. It does not confirm a diagnosis from one or two clicks, and it does not make a photo-only diagnosis.
Two quick observations can tell you whether to keep reading this diagnosis closely or compare other possibilities first.
Match the situation before acting
Healthy green plant with a known red cultivar
- Stems and leaves are firm and the plant is growing well.
Plan consistent long nights and adequate daytime light.
Pink, white, cream or patterned cultivar
- Its label or previous display shows another natural colour.
Aim for that cultivar’s coloured bracts, not forced red pigment.
Night treatment is interrupted
- Room lamps, a lit corridor or another source reaches the plant during the dark period.
Choose a reliably dark place or suitable opaque cover.
Plant is declining
- It wilts, sheds heavily or has soft tissue.
Stabilise health before attempting a timed display.
Safe checks before acting
- Check the label or an earlier photograph for the cultivar’s natural colour. Examine the green foliage and stem base; a plant losing healthy tissue is not ready for an ambitious display schedule.
- Walk through the actual day and night routine. Confirm bright daytime placement, every possible nighttime light interruption and a stable temperature. A dark cupboard that is forgotten all day does not provide the required daylight.
- Record when treatment can begin and whether you can maintain it consistently over many weeks. A late start changes expectations; extra darkness cannot safely compress a whole seasonal programme into a few days.
What to do next
- Use one coherent published routine. In the Illinois Extension example, begin the long-night treatment in late September: from 17:00 until 08:00 keep the plant in complete, uninterrupted darkness in a suitable room, cupboard or box. The source expects colour development around early to mid-December, with variation rather than a guaranteed date.
- From 08:00 until 17:00 return it to bright daylight. Continue normal moisture checks and drainage. Keep conditions stable; darkness does not replace daytime care or healthy leaves.
- If using an opaque cover, leave space around the plant, avoid heat sources and prevent heat or moisture building up. Do not enclose it in a sealed plastic bag. Confirm that the arrangement blocks light without crushing the brittle branches.
- Maintain the daily routine through the induction period described by that source, until bracts begin colouring. Check developing tips in comparable daylight. If the programme is interrupted, restore consistency rather than adding fertiliser or withholding all light.
- Use local seasonal guidance outside the northern-hemisphere autumn cycle. If there is too little time for this year’s display, keep a healthy green plant and plan the next appropriate cycle.
GardenSolved checkpoint
Do not do this yet
- Do not leave the plant in darkness all day, remove healthy green leaves or add bloom booster to force red colour.
- Do not average different 14-, 15- or 16-hour recommendations into a new recipe, or claim the chosen 15-hour example is a universal threshold.
Confirm the likely cause first, then choose the treatment.
What recovery can look like
- Recolouring takes a seasonal programme measured in weeks, not a quick rescue trick. Cultivar, plant condition and conditions influence the result; compare new bracts rather than expecting every old green leaf to turn red.
- If a consistently followed full programme produces no progress, recheck cultivar, daytime light, hidden nighttime light and temperature with a knowledgeable local grower. A home-grown plant may also be less compact than the plant originally purchased.
When to get more help
Pause the display programme if the plant starts wilting, rapidly losing leaves or developing soft tissue; investigate the active problem first. If it remains healthy but does not colour after the complete routine, seek growing advice using the start date, light arrangement and cultivar information. There is no reason to add a fungicide for absent colour alone.
Important context
The 17:00–08:00 example is 15 hours of darkness and a remaining nine-hour day. Other credible sources use different regimes. Those differences are a reason to follow a complete source, not to promise a single mandatory threshold.
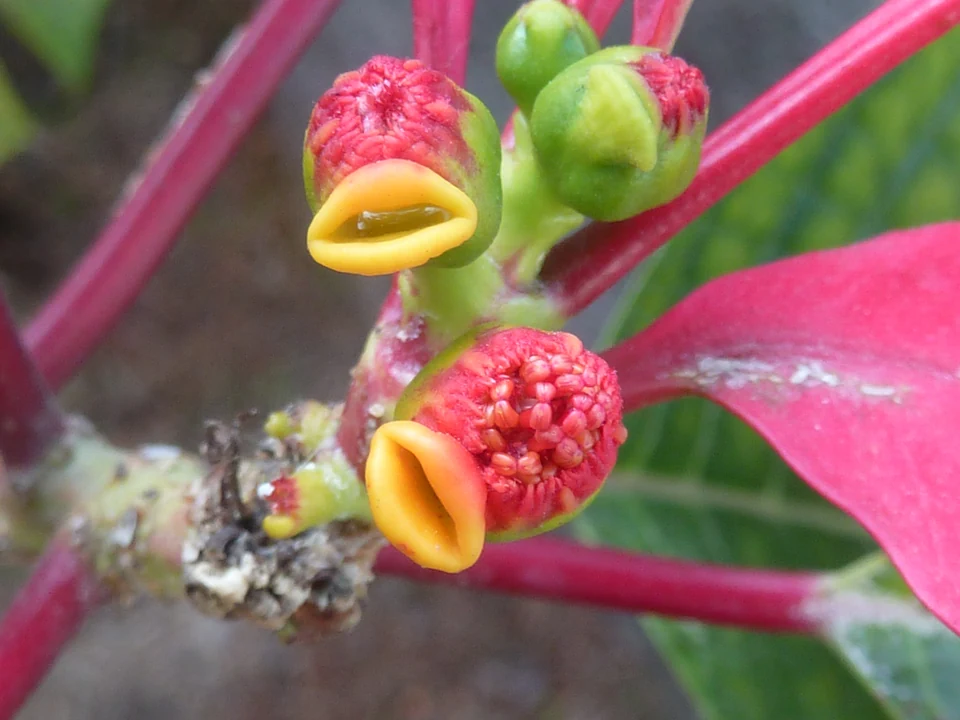
Small central flower structures are distinct from the surrounding bracts. The anatomy photograph explains that difference; it is not a before-and-after trial of this programme.
Follow the next useful clue
- The plant needs a healthy growth cycle first: Maintain it after the holiday display.What Should You Do With a Poinsettia After Christmas?
- You are unsure whether water is due during treatment: Keep normal condition-based watering.How Often Should You Water a Poinsettia?
- Leaves are being shed before treatment begins: Check the root ball and exposure history.Why Is My Poinsettia Dropping Leaves?
Sources and linked claims
Save & recheck
Compare what changes before changing course.
Save this diagnosis only in this browser, then come back and compare the same clues. No account, reminder subscription, or server-stored diagnostic record is created.
Your baseline
- Stems and leaves are firm and the plant is growing well.
- Its label or previous display shows another natural colour.
Check again when you return
- Check the label or an earlier photograph for the cultivar’s natural colour. Examine the green foliage and stem base; a plant losing healthy tissue is not ready for an ambitious display schedule.
- Walk through the actual day and night routine. Confirm bright daytime placement, every possible nighttime light interruption and a stable temperature. A dark cupboard that is forgotten all day does not provide the required daylight.
Tip: photograph the same area from a similar angle so the visible pattern is easier to compare.