Broad Beans
When are broad beans ready to harvest?
The short answer
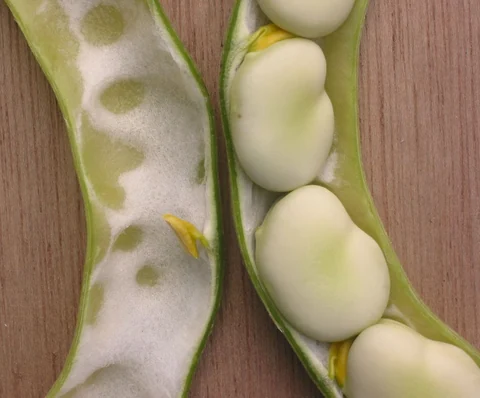
For fresh shelled beans, pick when the pods are still green and the beans inside have filled out. Open one lower pod to check the beans. If you are growing for dry beans, leave the pods to mature and dry when conditions allow.
Pick for the way you plan to use the beans. A sample pod gives a better signal than pod length or the date alone.
Diagnostic snapshot
What to check before you act
What you are seeing
- Tender beans for shelling
- Larger fresh beans
Check first
Open one lower pod on a representative plant. Check bean fill, tenderness and the colour of the attachment scar.
Hold off for now
Hold off on clearing the whole row based on the size of one pod.
Investigate further if
If many pods have dark spreading marks, shrivel prematurely or contain damaged seeds, photograph them and seek local identification. Avoid using affected seed for the next crop.
Photograph this before you act
- Photograph the whole plant and its growing area so the overall pattern is visible.
- Take one close-up of the clearest symptom and one wider view that shows the surrounding area for comparison.
Next best check
Check two visible clues before you act.
This mini-check narrows the match using the same canonical diagnostic clues as this answer. It does not confirm a diagnosis from one or two clicks, and it does not make a photo-only diagnosis.
Two quick observations can tell you whether to keep reading this diagnosis closely or compare other possibilities first.
Choose the situation that fits
| Your goal | What to look for |
|---|---|
| Tender beans for shelling | A full but still green pod with filled beans inside. A pale or green attachment scar on the seed is a useful cue for tenderness. |
| Larger fresh beans | A well-filled green pod. Check one before picking the whole row because beans become tougher as they mature. |
| Dry beans | Mature pods and fully dried seeds, handled according to local storage guidance. |
What to check first
- Open one lower pod on a representative plant. Check bean fill, tenderness and the colour of the attachment scar.
- Compare a higher pod and one from another plant. Use the packet’s timing as a prompt to inspect, then decide by what is inside.
What to do now
- Pick ready pods regularly and handle them gently.
- Use fresh beans soon and refrigerate pods if you need to hold them.
- Let a healthy crop mature further only if you want dry beans and the weather suits it.
GardenSolved checkpoint
Do not do this yet
- Hold off on clearing the whole row based on the size of one pod.
- Sample another plant and leave smaller pods to fill.
Confirm the likely cause first, then choose the treatment.
Food safety
People with G6PD deficiency should avoid broad beans, including cooked ones.
When to get help
If many pods have dark spreading marks, shrivel prematurely or contain damaged seeds, photograph them and seek local identification. Avoid using affected seed for the next crop.
Follow the next useful clue
- Flowers have not yet produced visible pods: Check pod set first.Why are my broad beans flowering but not producing pods?
- Pods have discoloured spots or premature shrivelling: Compare leaf, stem and pod disease patterns.What are the brown spots on my broad bean leaves?
- Harvest is finished: Plan the next sowing date.When should I sow broad beans?
Consulted sources
Save & recheck
Compare what changes before changing course.
Save this diagnosis only in this browser, then come back and compare the same clues. No account, reminder subscription, or server-stored diagnostic record is created.
Your baseline
- Tender beans for shelling
- Larger fresh beans
Check again when you return
- Open one lower pod on a representative plant. Check bean fill, tenderness and the colour of the attachment scar.
- Compare a higher pod and one from another plant. Use the packet’s timing as a prompt to inspect, then decide by what is inside.
Tip: photograph the same area from a similar angle so the visible pattern is easier to compare.