Garlic
Why is stored garlic going soft or mouldy?
The short answer
Separate soft, moldy or damaged garlic from sound bulbs. Review whether necks and wrappers dried fully, whether bulbs were injured and whether storage is dry and ventilated. Some decay begins in the field and appears later, so do not assume every storage problem is only humidity. Discard visibly spoiled cloves rather than trying to cure them back to health.
Curing dries protective tissues; it does not sterilize a diseased bulb. Sort affected stock first, then examine why deterioration occurred.
Diagnostic snapshot
What to check before you act
What you are seeing
- Soft or discolored tissue beneath garlic wrappers after harvest
- Mold or deterioration associated with damp packing or injured bulbs
Check first
Inspect the storage container and a few representative bulbs without mixing lots. Record damp necks, condensation, wounds, mold location and whether the problem starts at the base or neck.
Compare first
- Incomplete drying or damp storage
- Harvest or cleaning injury
- Possible field-carried disease
Hold off for now
Do not try to rescue moldy garlic by washing, drying again or peeling away visible decay for storage.
Investigate further if
Ask a diagnostic service about repeated basal or neck decay, unusual fungal growth or losses across a planting-stock lot. For preservation questions, use a food-preservation authority; this gardening answer and its image cannot certify food safety.
Photograph this before you act
- Photograph the whole plant and its growing area so the overall pattern is visible.
- Take one close-up of the clearest symptom and one wider view that shows the surrounding area for comparison.
Next best check
Check two visible clues before you act.
This mini-check narrows the match using the same canonical diagnostic clues as this answer. It does not confirm a diagnosis from one or two clicks, and it does not make a photo-only diagnosis.
Two quick observations can tell you whether to keep reading this diagnosis closely or compare other possibilities first.
Match the situation before acting
Incomplete drying or damp storage
- Necks remain moist, bulbs crowded or condensation present
Improve drying and ventilation for sound stock; isolate decay.
Harvest or cleaning injury
- Damage begins at cuts, bruises or exposed cloves
Sort damaged bulbs separately and improve handling.
Possible field-carried disease
- Basal or neck decay despite apparently suitable storage
Keep the lot separate and request diagnosis.
Dry shriveling rather than wet decay
- Light, dry tissue without a clear wet-rot pattern
Review age and conditions; do not label all softness as the same pathogen.
Safe checks before acting
- Inspect the storage container and a few representative bulbs without mixing lots. Record damp necks, condensation, wounds, mold location and whether the problem starts at the base or neck.
- Review curing and harvest history, including rain, heat, injury and field symptoms. Photograph affected material without tasting or deliberately inhaling mold; check neighboring bulbs separately.
What to do next
- Remove visibly spoiled material from the sound lot. Do not taste suspect cloves or save them for planting.
- For sound bulbs still curing, use a dry sheltered space with airflow and avoid piles that trap moisture. Keep tops attached during initial curing. Dryness of wrappers and necks matters more than declaring curing complete after a fixed number of days.
- Keep sound cured bulbs ventilated and protected from dampness and freezing. Storage performance depends on cultivar and conditions; a quoted maximum life is not a guarantee.
- Label lots by harvest and inspect them periodically. If decay continues despite appropriate conditions, seek help identifying whether field infection or another problem entered storage.
GardenSolved checkpoint
Do not do this yet
- Do not try to rescue moldy garlic by washing, drying again or peeling away visible decay for storage.
- Do not put peeled garlic in oil at room temperature. Preservation in oil is a separate food-safety process and requires a validated method, not this bulb-storage guide.
Confirm the likely cause first, then choose the treatment.
Scope and follow-up
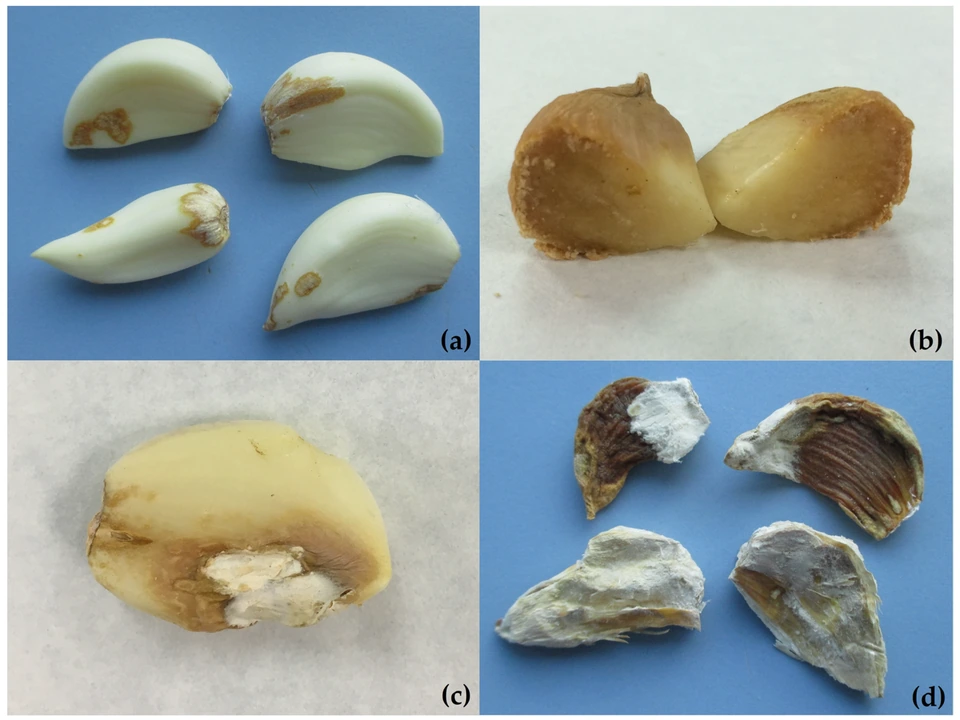
A sprout in an otherwise firm clove is not the same sign as soft, discolored or moldy tissue. Inspect those conditions separately. The source-identified dry-rot photographs show brown lesions, internal deterioration, white growth and shrivelling; these images cannot identify your pathogen, and absence of visible mold does not certify safety.
This answer covers whole-bulb curing and storage. It does not provide canning, acidification or room-temperature garlic-in-oil instructions. Keep those questions with tested preservation guidance.
When to get more help
Ask a diagnostic service about repeated basal or neck decay, unusual fungal growth or losses across a planting-stock lot. For preservation questions, use a food-preservation authority; this gardening answer and its image cannot certify food safety.
Follow the next useful clue
- Bulbs entered storage with exposed cloves: Review wrapper splitting and sorting.Why are my garlic bulbs splitting open?
- Basal white growth and black structures are present: Compare white-rot signs and contain suspect soil or planting stock.Is white growth at my garlic bulb base white rot?
- The next crop's lifting time needs improving: Plan representative harvest checks.When is garlic ready to harvest?
Consulted horticultural sources
Save & recheck
Compare what changes before changing course.
Save this diagnosis only in this browser, then come back and compare the same clues. No account, reminder subscription, or server-stored diagnostic record is created.
Your baseline
- Soft or discolored tissue beneath garlic wrappers after harvest
- Mold or deterioration associated with damp packing or injured bulbs
Check again when you return
- Inspect the storage container and a few representative bulbs without mixing lots. Record damp necks, condensation, wounds, mold location and whether the problem starts at the base or neck.
- Review curing and harvest history, including rain, heat, injury and field symptoms. Photograph affected material without tasting or deliberately inhaling mold; check neighboring bulbs separately.
Tip: photograph the same area from a similar angle so the visible pattern is easier to compare.
Related questions
Diagnostic Finder
Still not sure this answer fits?
Open the Diagnostic Finder with the relevant growing subject or care context preselected and compare other published GardenSolved diagnoses.
Compare other possibilities